New keyboard: Alicjav2
摘要
作者分享了自己从原型键盘 Alicja v1 升级到 v2 的完整过程:尝试多种布局失败后,借助 KLE NG 在线工具快速生成 PCB 和外壳文件,用 RP2040 Stamp 主控、Kailh 热插拔轴座、编码器等完成组装,并记录了选错键帽尺寸、5 向开关焊接问题等失误,以及未来改进计划(外壳、USB hub、可调脚垫)。
荐读理由
文中介绍的KLE NG工具能显著简化键盘PCB设计流程,对硬件DIY有参考价值,但读者是AI工程创业者,该工具与AI产品开发关联弱,且内容未涉及创业或技术洞见,仅可作为边缘工具了解。
原文
After over a year of using Alicja, my prototype keyboard, it is time to build a new one: Alicja v2.
Experiments
Since building Alicja v1, I have been trying out a few design ideas. Some were intended to make the board sturdier, such as 3D printing a far better plate for another handwired build.
I tried different layouts. 3D printed a case for Redox keyboard, built one half and tried to use it. Not my style as it is too far from typical pc105 layout.
Created the H261 keyboard as some kind of orthogonal Alicja but it was too awful.
KLE NG to the rescue
I used Keyboard Layout Editor (KLE) with several of my keyboard experiments. And one day I got info from Adam Wysocki (adamws) about his KLE NG online tool. Which changed everything…
You see, with previous tools, designing a keyboard was a lot of work. Now, with KLE NG, it is a matter of creating a design and pressing some buttons. The result consists of PCB files for KiCAD and plate files for CAD software.
KiCAD
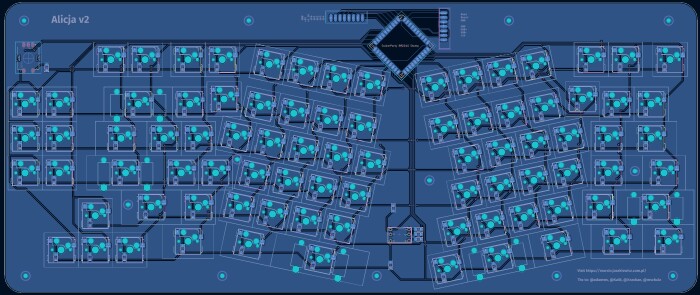
I loaded files created by KLE NG and it turned out that making a PCB for a new keyboard is quite simple:
add MCU (I used RP2040 Stamp from Solder Party)
add encoder
add whatever else
route everything
define PCB edge
generate gerber files
order PCB
During the whole process I learnt a lot, mostly from my friends in the retro community.
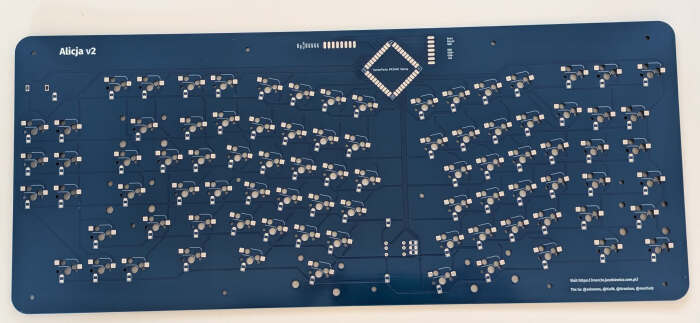
I ordered PCB in China, the process and shiping took about two weeks and I had five PCBs ready for soldering:
Changes since the first Alicja keyboard
As you may see the main change is the PCB. Handwired keyboard had its own value but in the long run was a source of problems and frustration.
I changed the MCU board, as RP2040 Stamp allowed me to put USB signals on a connector instead of having it on MCU board. It will help when I add USB hub to the keyboard.
The whole keyboard uses Kailh MX hotswap sockets to make it easier to play with different switches. At the moment I am using some brown ones I got for free at the Mechanicon 2025 event.
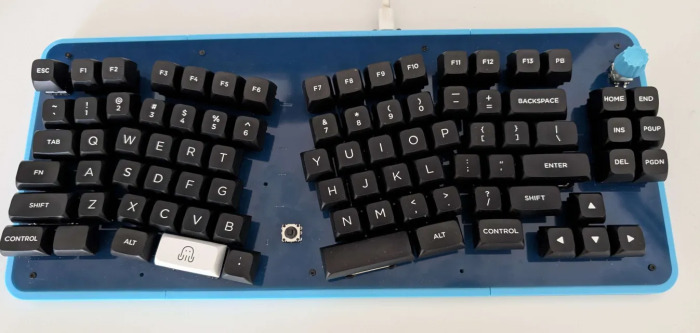
I kept only one encoder — the one for media control. By default it changes volume level (and mutes on press). With the Fn key I can change to next/prev song and play/pause it.
There are some more keys — I added right Control key as I missed it several times. The whole Home/End/Ins/Del/PgUp/PgDn block is present. In a different setup than usual so adapting to it will take some time. And I have now F13 and F14 keys (not decided yet what to define on them).
The space in the middle got one of those funny 5-way switches. I have not decided how to use it yet. Maybe it will be some kind of silly mouse.
There is a connector with some free GPIO lines and power. Who knows, maybe one day I will decide to make a hole and add a trackpoint from some old Lenovo laptop.
I also have stabilisers for all 2u+ keycaps. Finally ;D
And the last change: a simple, 3D-printed case. Mounted on a few M2 screws (I used M2 threaded inserts). Will be replaced with a better design one day.
Mistakes
Of course, I had to make a few mistakes.
The main one, visible in the picture above, is the left space key. I used a 2u size for it instead of a 2.25u one. As a result, I had to choose some non-blank keycap from the Akko WOB MDA set instead of using a 2.25u blank one.
The other, not visible one, is the footprint of the 5-way switch. It does not work as expected. However, I might just need to re-solder the diodes the other way round, and it will work.
The connectors on the bottom side (both for the USB+buttons and the expansion port) are a bit bulky — I used JST XH 2.54 ones here. They were supposed to be used as THT rather than as SMD, so they take a lot of space. Anyway, those are inside the case, so no one can see them.
Plans for changes
I need to design a proper case. With space for USB ports (two at the back, one on the left) and an internal USB hub.
I also need a way to attach feet so the keyboard angle can be adjusted (now I have 4 rubber feet attached).
And I plan to use it for quite a while. Which will not stop me from working on some other designs.
这条对你有帮助吗?